
![]() A favicon is crucial to the identity of any blog and therefore should be treated as such. Too often I’ve come across a lot of blogs that have not implemented this little but yet important icon.
A favicon is crucial to the identity of any blog and therefore should be treated as such. Too often I’ve come across a lot of blogs that have not implemented this little but yet important icon.
If you’re one of them that hasn’t done so, perhaps you should now. To implement this take little or no effort and can be achieve very quickly, so in other words every blog should have one.
Before I go any further, Let me explain what a favicon is and why is it important to your blog. A favicon, short for favorite icon is a bookmark icon or URL icon that is associated with a particular website or webpage according to Wikipedia.
This icon is displayed in your web browser when you visit a website/blog or when you create a bookmark. It is very important to your website or blog online brand equally the same as a logo or business card is to traditional offline business. By making the mistake and not implement one of these icons on your blog could leave you brand undistinguished in someone’s bookmark folder and could cause reduction in repeat visit to your blog.
To give yourself a better chance of getting a repeat visit from the person who bookmarked your blog you need to have this icon implemented. I’ve recently implemented mine and will show you how to get yours.
As I mention above this is fairly easy and you can follow the steps below to create one but first you will need a graphic editor like Photoshop or Paint to get started.
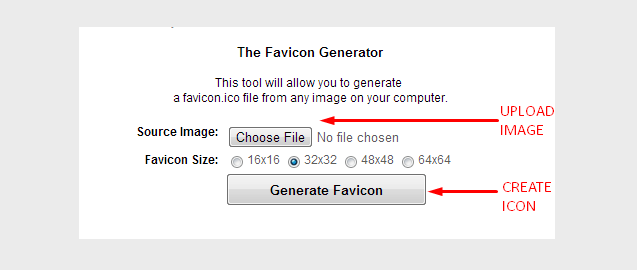
To get started create a 100×100 pixel image in Paint or the editor of your choice and save the image to your desktop then open this website favicon.co.uk in your browser to complete the next step.
Select choose file and upload the image then press the generate favicon button to create the icon.
Once the icon is created save it to your desktop then use Filezilla or any other FTP client of your choice to upload it to the root directory of your site. It should be accessible at www.yoursite.com/favicon.ico.
You will now need to add the following source code in the header.php file of your theme folder. This can be achieved by logging in your WP Admin Panel and go to appearance =>>editor =>>header.php and place the source code below between the opening <head> and closing </head> head tag.
<link rel="shortcut icon" href="www.yoursite.com/favicon.ico" type="image/x-icon" />
This step complete the process and you should see your favicon appear in your browser now. Keep in mind it can take up to a day before it appear so don’t worry too much if this the case.
Your turn, what you think about blogs without a Favicon? Leave your comments below.